Mixture Density Network(1)
之前在IOP的那篇论文里提到过,反演问题的数学本质是一个病态问题。而机器学习和深度学习本质上解决的都是分类和回归问题,并不能直接解决病态问题。最近重新查看一些论文,终于想起了之前看过的一些东西。
几篇论文、
- “Seamless retrievals of chlorophyll-a from Sentinel-2 (MSI) and Sentinel-3 (OLCI) in inland and coastal waters: A machine-learning approach”. N. Pahlevan, et al. (2020). Remote Sensing of Environment. 111604. 10.1016/j.rse.2019.111604.
- “Robust algorithm for estimating total suspended solids (TSS) in inland and nearshore coastal waters”. S.V. Balasubramanian, et al. (2020). Remote Sensing of Environment. 111768. 10.1016/j.rse.2020.111768. Code.
- “Hyperspectral retrievals of phytoplankton absorption and chlorophyll-a in inland and nearshore coastal waters”. N. Pahlevan, et al. (2021). Remote Sensing of Environment. 112200. 10.1016/j.rse.2020.112200.
- “A Chlorophyll-a Algorithm for Landsat-8 Based on Mixture Density Networks”. B. Smith, et al. (2021). Frontiers in Remote Sensing. 623678. 10.3389/frsen.2020.623678.
这几篇论文都是Pahlevan搞的,代码都放在https://github.com/BrandonSmithJ/MDN,但是跟怕别人偷走一样,对于怎么重新应用只口不提。
一篇篇来看吧
Seamless retrievals of chlorophyll-a from Sentinel-2 (MSI) and Sentinel-3 (OLCI) in inland and coastal waters: A machine-learning approach
这篇论文是Pahlevan搞得第一篇,重点来看看他的这个网络是怎么做的,MDN的原理回合后面实现一起讲
训练过程
因为他们的数据足够多,所以只用了1/3,大概1000个数据来训练。
输入数据只有400-800的Rrs.
所有的feature都log-transformed, normalized based on median centering and interquartile scaling, and then scaled to the range (0,1);
这个步骤是咋做的呢,我去翻了翻他们的源代码,对于传进来的data,会利用from .transformers import TransformerPipeline, generate_scalers 这个scalers来做变换。
然后
1 | from sklearn import preprocessing |
?不是说的0-1吗?
具体用的应该是这一个https://scikit-learn.org/stable/modules/generated/sklearn.preprocessing.RobustScaler.html,然后对y做的就是MinMaxScaler了。
然后应该是把这个参数存下来,等到后面在做的时候重新来弄,不然一个单独的数哪儿来的IQR。
等到后面具体实现的时候可以认真看下。
输出的数据output variables are subject to the same normalization method

然后放了这么一张图上来。
不是,我也没见你哪里有做feature engineering啊。
再看后面几个论文的时候发现把feature engineering给去掉了hhh,果然顶刊也是很容易出问题的啊。
然后对于调参
These choices appear to be fairly robust to changes within the current implementation, especially with regard to the MDN-specific parameters. Following experimenting with several architectures, we found that the model is very robust to changes in various hyperparameters.
在这种情况下他们就只用了一个a five-layer neural network with 100 neurons per layer, which is trained to output the parameters of five Gaussians.
The median estimates from the MDN model taken over ten trials of random network initializations are the predicted Chla for a given *R**rs* spectrum. Here, the same training data are used for all trials.
这篇论文关于网络的部分基本就这么结了,看下一个
Robust algorithm for estimating total suspended solids (TSS) in inland and nearshore coastal waters
直接跳到训练过程
其实有点想吐槽,这么直接的复制粘贴,好多地方都一样,真的不会被判抄袭吗,这篇论文有意思的地方是结合了MDN,QAA,水体光学分类,来做TSS。
和上一篇论文不同的地方只有
. The current default model uses a five-layer neural network with 25 neurons per layer, which is trained to output the parameters of five Gaussians. From this mixture model, the overall estimate is selected via the Gaussian with the maximum prior likelihood. The described model is trained a number of times with random initializations of the underlying neural network, in order to ensure a stable final output of the estimates. The median estimate is taken as the final result of these trials, with convergence occurring within some small margin of error after approximately ten trials
Hyperspectral retrievals of phytoplankton absorption and chlorophyll-a in inland and nearshore coastal waters
没有任何其他的区别。
真要说的话就是他们训练了俩模型,也不太懂为什么要训练俩。
A Chlorophyll-a Algorithm for Landsat-8 Based on Mixture Density Networks
这个是这么说的
. All models examined in this study have simply used ‘reasonable’ default values for their hyperparameters (Glorot and Bengio 2010; Hinton 1990; Kingma and Ba 2014) namely: a five layer neural network with 100 nodes per layer, learning a mixture of five gaussians; a learning rate, L2 normalization rate, and
value all set to 0.001; and with training performed via Adam optimization over a set of 10,000 stochastic mini-batch iterations, using a mini-batch size of 128 samples.
这篇论文其实很有意思。
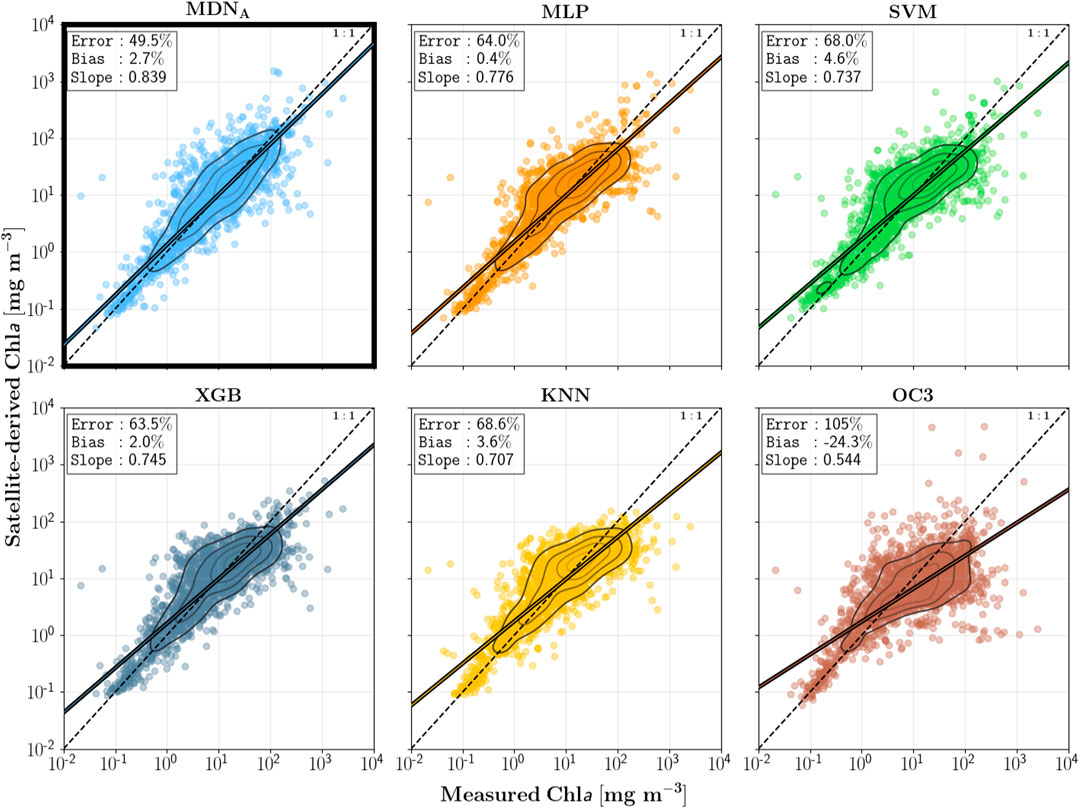
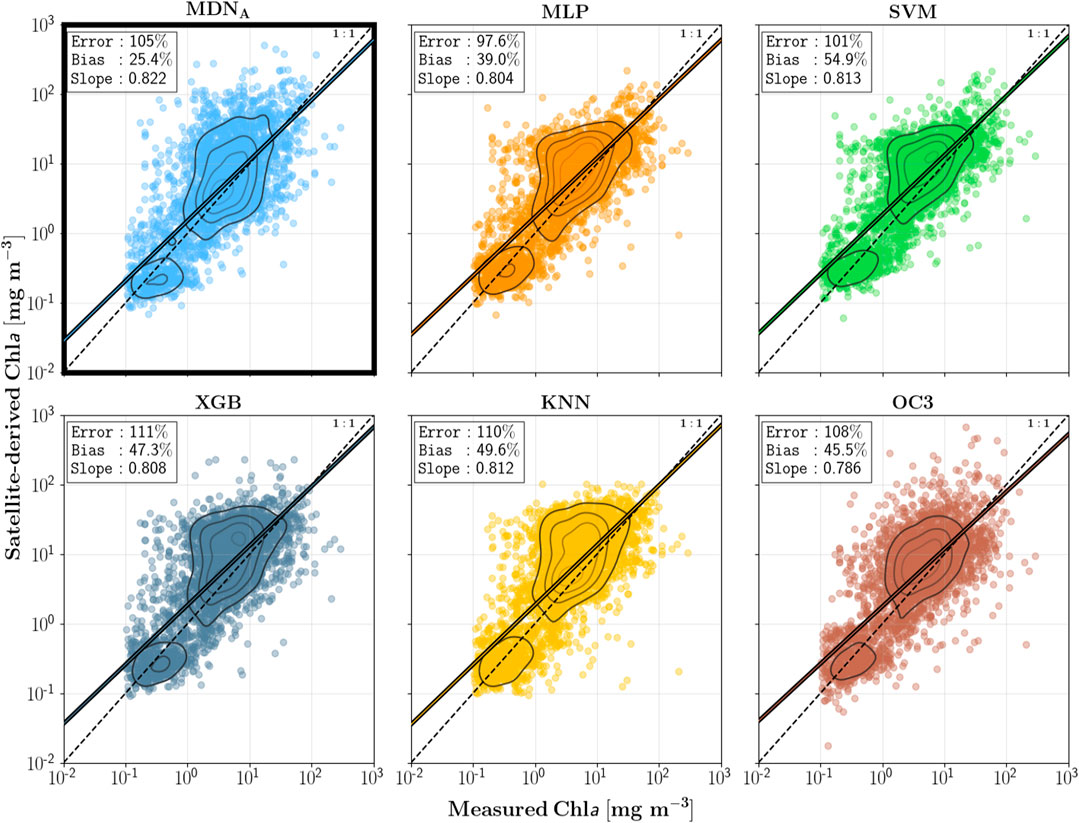
这篇论文的一个主要目的是证明MDN这个专门针对反演问题的网络架构和其他的神经网络架构相比的优越性。具体结果可以看这几张图。


还比较了我之前想试着用的cao 2020用过的XGBoost
这篇论文的补充材料里的讨论也写的贼有意思,感觉这个讨论是用来怼某个审稿人的。我来翻译一下这个讨论。
审稿人问:你为啥不改你模型的参数啊
While no hyperparameter optimization has taken place over the course of this work, it is an important step to ensure optimal performance and generality.
These choices are mostly arbitrary, as the goal of this study was to present the feasibility and theoretical backing of the MDN model
These choices are mostly arbitrary, as the goal of this study was to present the feasibility and theoretical backing of the MDN model. A full optimality demonstration, on the other hand, would require a significantly longer study than already presented.
回答:第一,重点不在这,第二,没空,先水一个论文再说。
审稿人:不行,你得证明你这个模型参数不重要。
Nevertheless, we would be remiss to exclude any discussion which examines the hyperparameter choices, and so what follows is a (very) brief look at how select parameters affect performance.
回答:行吧,既然你不懂,我们就稍微给你讲一下,而且我们觉得你听不懂,我们给你们讲个最简单的。
First, some terminology must be defined in order to make it clear what is being examined. Normally in hyperparameter optimization, and machine learning in general, the dataset is split into three parts: training, validation, and testing. The training set is of course used to train the model on; the validation set is used to optimize the model using data unseen during training; and the testing set is used only at the end, in order to benchmark performance.
回答:爷来给你们讲一下定义。
As mentioned, no explicit hyperparameter optimizations have taken place thus far in the study. Default values were chosen based on those commonly used in literature and in available libraries (e.g. scikit-learn), and as will be seen, do not represent the optimal values for our specific data. As such, no separate validation set was set aside for the purposes of such an exercise.
因为我们没有做一个精确的超参数调整,所以我们就没做val那一部分的数据集,只做了train test
One of the main questions any reader may have is, “how large is the model?”.
我知道你们不是这行的,提不出来啥专业问题,我来提一个。
然后给了两张图看layer和node的影响

接着给看了learning curve


怼的真的很好哈哈哈
看源代码之前补充一些知识
不想看可以直接跳过
### class的一些知识补充
自己之前逃的课都会以另一种方式回来,面向对象,这不就又来了。
类包括同时包括valuable 和function,前者是类的属性,后者是类的方法。
比如一个人的身高和体重就是属性,说话吃饭是他的方法
定义的方法
1 | class ClassName: |
在这里面呢,empCount变量是一个类变量,这个值在所有的实例之间共享,访问方法为Employee.empCount
第一种方法 init() 方法是一种特殊的方法,被称为类的构造函数或初始化方法,当创建了这个类的实例时就会调用该方法。意思就是每次创建一个类的实例,就会给name和salary赋值,然后Employee.empCount+1
这里面self代表的是实例,意思比如你定义了一个李华进去,这个self就代表了李华,可以理解为你定义一个fun(x,y,z),然后调用的时候用的是fun(a,b,c), self只是他在类内部的名字而已,调用的使用不需要传入相应的参数。
这就是类和函数一个特别的区别,类必须由一个额外的第一个参数名称。
更具体一点的区别可以看这里
1 | class Test: |
执行结果为
1 | <__main__.Test instance at 0x10d066878> |
第一行输出的是instance,代表一个实例,第二行是这个类本身。
self不是关键词,可以改成akb48。
想要调用必须创建一个实例
1 | #"创建 Employee 类的第一个对象" |
这些参数是通过init来接收的
和函数很类似,可以修改和访问实例里面的属性
1 | emp1.displayEmployee() |
这个结果是
1 | Name : Zara ,Salary: 2000 |
同时也可以添加、删除、修改类的属性。
1 | emp1.age = 7 # 添加一个 'age' 属性 |
也可以使用这些函数来访问属性
- getattr(obj, name[, default]) : 访问对象的属性。
- hasattr(obj,name) : 检查是否存在一个属性。
- setattr(obj,name,value) : 设置一个属性。如果属性不存在,会创建一个新属性。
- delattr(obj, name) : 删除属性
1 | hasattr(emp1, 'age') # 如果存在 'age' 属性返回 True。 |
python有一些内置的类属性,意思是你创建这个类的时候就有这些属性。包括:
- dict : 类的属性(包含一个字典,由类的数据属性组成)
- doc :类的文档字符串
- name: 类名
- module: 类定义所在的模块(类的全名是’main.className’,如果类位于一个导入模块 mymod 中,那么 className.__module__ 等于 mymod)
- bases : 类的所有父类构成元素(包含了以个由所有父类组成的元组)
调用方式为
1 | class Employee: |
这个输出的结果是
1 | Employee.__doc__: 所有员工的基类 |
类的继承和多态
面向对象最大的好处是代码的重用。
还是看代码更容易理解一些
1 | class Parent: # 定义父类 |
父类只去定义一些最基本的属性和方法
多态是比如果说,我们在员工里增加这么一个方法
1 | class Employee: |
现在我我们想雇佣童工了,就可以把新的子类写为
1 | class child(Employee): |
当子类和父类都存在相同的 print_title()方法时,子类的 print_title() 覆盖了父类的 print_title(),在代码运行时,会调用子类的 print_title()
多态的好处就是,当我们需要传入更多的子类,例如新增 Teenagers、Grownups 等时,我们只需要继承 Person 类型就可以了,而print_title()方法既可以直不重写(即使用Person的),也可以重写一个特有的。这就是多态的意思。调用方只管调用,不管细节,而当我们新增一种Person的子类时,只要确保新方法编写正确,而不用管原来的代码。这就是著名的“开闭”原则:
iterator
讲什么样的类才能循环,我感觉暂时用不到
访问限制
如果我们不想让某个属性被外界访问到,可以增加访问限制,就像
1 | class JustCounter: |
模块的调用
Python 模块(Module),是一个 Python 文件,以 .py 结尾,包含了 Python 对象定义和Python语句。
意思就是,我们可以把类也放到模块里,跟函数一样去调用。
MDN的实现
说了这么多,啥是MDN呢
打算结合这个里面来讲。
重点来看他们是怎么实现MDN的,然后对比一下论文的源代码。最后再去讲原理。
在看这个之前,请先把这个看完来补补课
1 | class MDN(nn.Module): |
让我们详细说一下这个MDN是怎么构造的
对于每一个输入的x,我们预测的是y的分布
$P(y|x) = \sum_{k}^{K} \Pi_{k}(x) \phi(y, \mu_{k}(x), \sigma_{k}(x))$
- k is an index describing which Gaussian we are referencing. There are K Gaussians total.
- $\sum_{k}^{K}$ is the summation operator. We sum every k Gaussian across all K. You might also see $\sum_{k=0}^{K-1}$ or $\sum_{k=1}^{K}$ depending on whether an author is using zero-based numbering or not.
- Πk acts as a weight, or multiplier, for mixing every k Gaussian. It is a function of the input x: Πk(x)
- ϕ is the Gaussian function and returns the at y for a given mean and standard deviation.
- μk and σk are the parameters for the k Gaussian: mean μk and standard deviation σk. Instead of being fixed for each Gaussian, they are also functions of the input x: μk(x) and σk(x)
All of σk are positive, and all of the weights Π sum to one:
$\sum_{k}^{K} \Pi_{k} = 1$
First our network must learn the functions Πk(x), μk(x), σk(x) for every k Gaussian. Then these functions can be used to generate individual parameters μk, σk, Πk for a given input x. These parameters will be used to generate our pdf P(y|x). Finally, to make a prediction, we will need to sample (pick a value) from this pdf.
In our implementation, we will use a neural network of one hidden layer with 20 nodes. This will feed into another layer that generates the parameters for 5 mixtures: with 3 parameters Πk, μk, σk for each Gaussian k.
Our definition will be split into three parts.
First we will compute 20 hidden values zh from our input x.
zh(x) = tanh (Winx+bin)
Second, we will use these hidden values zh to compute our three sets of parameters Π, σ, μ:
$ z_= W_{} z_h + b_{}\ z_= W_{} z_h + b_{}\ z_= W_{} z_h + b_{} $
Third, we will use the output of these layers to determine the parameters of the Gaussians.
$ = \ = (z_{})\ = z_{} $
- exp (x) is the exponential function also written as ex
We use a softmax operator to ensure that Π sums to one across all k, and the exponential function ensures that each weight Πk is positive. We also use the exponential function to ensure that every σk is positive.
懂了,这个构造的方式其实是利用MDN预测了高斯混合网络的几个参数,再从整个PDF里面取值作为预测值。
那么就牵扯到一个问题,就是我的y值只有一个,但是MDN产生的结果是一个分布,怎么计算loss来更新权重呢?
请见下篇